Download all the software to get started.
This is the first step towards Installation of SOA Suite.
For this you need to have anyone of following versions but I will be using Oracle XE Universal database version 10.2.0.1 as it is already installed on my machine i. Oracle XE Universal database version 10.2.0.1
ii. Oracle 10g database version 10.2.0.4+
iii. Oracle 11g database version 11.1.0.7+
Note: You can not use any other database version in 11gR1 (certification of additional database is on the road map). Specifically, you cannot use XE Standard, It must be Universal.
Note: When you are using XE, you will see a warning when you install the database schema that this database version is too old. You can safely Ignore this warning as it applies only to production environments.
Once you are done with Installation of Oracle XE, you must update database parameters.
- Oracle Database OracleXEUniv.exe
- WebLogic Server wls1035_oepe111172_win32.exe
- Repository Creation Utility ofm_rcu_win_11.1.1.5.0_disk1_1of1.zip
- SOA Suite ofm_soa_generic_11.1.1.5.0_disk1_1of2.zip, ofm_soa_generic_11.1.1.5.0_disk1_2of2.zip
- OSB ofm_osb_generic_11.1.1.5.0_disk1_1of1.zip
Oracle Database Setup
This is the first step towards Installation of SOA Suite.
For this you need to have anyone of following versions but I will be using Oracle XE Universal database version 10.2.0.1 as it is already installed on my machine i. Oracle XE Universal database version 10.2.0.1
ii. Oracle 10g database version 10.2.0.4+
iii. Oracle 11g database version 11.1.0.7+
Note: You can not use any other database version in 11gR1 (certification of additional database is on the road map). Specifically, you cannot use XE Standard, It must be Universal.
Note: When you are using XE, you will see a warning when you install the database schema that this database version is too old. You can safely Ignore this warning as it applies only to production environments.
Once you are done with Installation of Oracle XE, you must update database parameters.
Set the
processes parameter to >=500 using the following instructions.
Login to sqlplus
with sysdba and run following commands
sqlplus connect
sys as sysdba
SQL> show parameter session
SQL> show parameter processes
SQL> alter system reset sessions scope=spfile sid='*';
SQL> alter system set processes=500 scope=spfile;
SQL> shutdown immediate
SQL> startup
SQL> show parameter session
SQL> show parameter processes
SQL> alter system reset sessions scope=spfile sid='*';
SQL> alter system set processes=500 scope=spfile;
SQL> shutdown immediate
SQL> startup
SQL> show parameter session

SQL> show parameter processes

Schema Configuration
Note: If you want to use Oracle XE as your database, you need to set the RCU_JDBC_TRIM_BLOCKS environment variable to TRUE *prior* to running RCU
1. To create the new schema, unzip ofm_rcu_win_11.1.1.5.0_disk1_1of1.zip navigate to rcuHome\bin and open a command window and run rcu.bat

3. On the Welcome screen, click on Next..
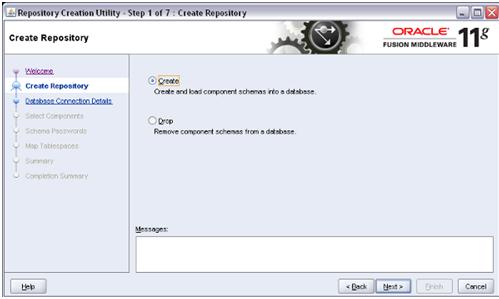
5. Enter the database information.
 6. Click on Next.

7. If you are using XE, you will see a warning at this point that this version is too old. You can safely ignore this warning as it applies only to production environments.

9. On the Select Components screen, enter DEV in the field for creating a new prefix.
10. Select the component SOA Infrastructure. Dependent schemas are selected automatically.
11. If you choose to select other components, these install instructions may not match your install experience. Also, you may have to increase processes in XE (you will get a message telling you what is required).

12. Click on Next.
13. The pre-requisites for this step are checked. When completed, click on OK.
14. Select the radio button to Use the same password for all schemas. Enter a schema password. The password welcome1 is assumed in this document but you should choose your own secure password or a different one for each schema and be sure to record your passwords as you will need them later.

16. Review the tablespaces and schema owners for the components.
17. Accepting the defaults, click on Next, and then click on OK to create the tablespaces.
18. When the pre-requisites for this step are completed, click on OK.

19. Click on Create to create the tablespaces. This takes about two minutes.
20. When completed, click on Close.

4. Click on Next.
5. Enter email address to register for security alerts or deselect the checkbox and decline—whichever you prefer—and click on Next.
6. Select Typical, and click on Next.
7. Review installation directories.

8. Click on Next.
9. Select "All Users" Start Menu folder and click on Next.
10. Review Summary.

11. Click on Next to start the installation process. Installation takes about three minutes.
When the installation is complete, deselect the Run Quickstart checkbox and click on Done.

4. Click on Next.
5. On the Specify Installation Location screen, select the middleware home:
C:\Oracle\Middleware\home_11gR1.
6. Enter Oracle home: Oracle_SOA1. If you use a different Oracle home, then adjust accordingly when Oracle_SOA1 is referenced throughout this document.

7. Click on Next.
8. Review Summary.

9. Click on Install.
10.Wait for the installation to complete—it takes a few minutes. Click on Finish.
1. In a command window, enter:
C:\OSB\Disk1\Setup –jreLoc C:\Oracle\Middleware\home_11gR1\jdk160_11
2. When the install wizard Welcome screen comes up, click on Next.

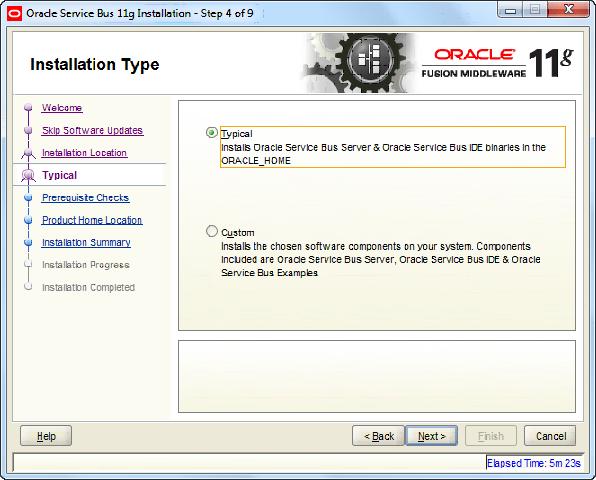
5. Select “Typical” Installation and click Next:

6. Pre-requisites will be checked - click Next once done:

7. Accept default locations and click Next:

8. Review the summary and click Install
9. When it reaches to 100% - click Next and Finish

4. Click on Next.
5. Enter the domain name: domain1. or any other desired domain name

6. Click on Next.
7. Enter the user name as weblogic and a password. The password welcome1 is assumed in this document but you should choose your own secure password and remember it for later in the document when the password is referenced.

8. Click on Next.
9. Select the Sun SDK 1.6_11 and leave Development Mode checked.


13. Now, look at the table. Review the Schema Owner column and confirm that the values are the same as what you configured in the Configure Schema section when you ran the RCU. Go back and review the screenshots in that section of this document for the schema owners if you do not remember them.
14. Complete the following if the schema owners need to be updated:

17. If all are successful, click on Next, otherwise click on Previous and correct any errors.
18. You will now see options for optional configurations. Select Administration Server, Managed Servers Cluster and Machines and Deployments and Services.


And then again Next.
20. On the Configure Machine screen Click next.

21. On the next screen Move AdminServer to the right and click Next.

22. For Target Services to Cluster or Servers,If not already done, select AdminServer on the left and click Select All on the right. Click Next.

23. You reach the Configuration Summary screen.
Click on Create.

24. Wait for the creation to finish it takes few minutes. Click on Done.
Now you can access Oracle Enterprise Manager on http://<YourHost>:7001/em
18. When the pre-requisites for this step are completed, click on OK.

19. Click on Create to create the tablespaces. This takes about two minutes.
20. When completed, click on Close.
WebLogic Installation
First, you install Oracle WebLogic Server.
1. To install WebLogic Server run wls1035_oepe111172_win32.exe
2. When the Welcome screen for the install wizard comes up, click on Next.
3. Select Create a new Middleware Home and enter: C:\Oracle\Middleware\home_11gR1.
1. To install WebLogic Server run wls1035_oepe111172_win32.exe
2. When the Welcome screen for the install wizard comes up, click on Next.
3. Select Create a new Middleware Home and enter: C:\Oracle\Middleware\home_11gR1.

4. Click on Next.
5. Enter email address to register for security alerts or deselect the checkbox and decline—whichever you prefer—and click on Next.
6. Select Typical, and click on Next.
7. Review installation directories.

8. Click on Next.
9. Select "All Users" Start Menu folder and click on Next.
10. Review Summary.

11. Click on Next to start the installation process. Installation takes about three minutes.
When the installation is complete, deselect the Run Quickstart checkbox and click on Done.
Installing SOA
Once the database is configured, and WebLogic is installed now you can install the SOA server into the Oracle Home on the WebLogic server.
Extract ofm_soa_generic_11.1.1.5.0_disk1_1of2.zip, ofm_soa_generic_11.1.1.5.0_disk1_2of2.zip at C:\SOA (this can be any path where you want to extract these zip files)
Extract ofm_soa_generic_11.1.1.5.0_disk1_1of2.zip, ofm_soa_generic_11.1.1.5.0_disk1_2of2.zip at C:\SOA (this can be any path where you want to extract these zip files)
1. In a command window, enter:
C:\SOA\Disk1\Setup –jreLoc C:\Oracle\Middleware\home_11gR1\jdk160_11
2. When the install wizard Welcome screen comes up, click on Next.
3. Wait for the pre-requisite check to complete (it's quick!).
C:\SOA\Disk1\Setup –jreLoc C:\Oracle\Middleware\home_11gR1\jdk160_11
2. When the install wizard Welcome screen comes up, click on Next.
3. Wait for the pre-requisite check to complete (it's quick!).

4. Click on Next.
5. On the Specify Installation Location screen, select the middleware home:
C:\Oracle\Middleware\home_11gR1.
6. Enter Oracle home: Oracle_SOA1. If you use a different Oracle home, then adjust accordingly when Oracle_SOA1 is referenced throughout this document.

7. Click on Next.
8. Review Summary.

9. Click on Install.
10.Wait for the installation to complete—it takes a few minutes. Click on Finish.
Oracle Service Bus (OSB) Installation
Once SOA is installed into Oracle Home we are ready to Install OSB on that.
Extract ofm_osb_generic_11.1.1.5.0_disk1_1of1.zip at C:\OSB (this can be any path where you want to extract these zip files)
Extract ofm_osb_generic_11.1.1.5.0_disk1_1of1.zip at C:\OSB (this can be any path where you want to extract these zip files)
C:\OSB\Disk1\Setup –jreLoc C:\Oracle\Middleware\home_11gR1\jdk160_11
2. When the install wizard Welcome screen comes up, click on Next.
3. Select “Skip Software Updates” and click “Next”
4. Leave default values for location:
4. Leave default values for location:

5. Select “Typical” Installation and click Next:
6. Pre-requisites will be checked - click Next once done:

7. Accept default locations and click Next:

8. Review the summary and click Install
9. When it reaches to 100% - click Next and Finish
Domain Creation
This step describes detail for configuring the WebLogic server domain for the SOA server.
1. In a command window, enter:
C: /Oracle/Middleware/home_11gR1/Oracle_SOA1/common/bin
Config.cmd
2. When the configuration wizard's Welcome screen comes up, select Create a new WebLogic domain, and then click on Next.
3. Select Generate a domain and select SOA Suite, Enterprise Manager, and Business Activity Monitoring. Dependent products are selected automatically.

4. Click on Next.
5. Enter the domain name: domain1. or any other desired domain name

6. Click on Next.
7. Enter the user name as weblogic and a password. The password welcome1 is assumed in this document but you should choose your own secure password and remember it for later in the document when the password is referenced.

8. Click on Next.
9. Select the Sun SDK 1.6_11 and leave Development Mode checked.

10. Click on Next.
11. On the Configure JDBC Component Schema screen, you select the components that you want to change, and then enter the property value for those components. First, select all of the components and enter welcome1 for the password in the Schema Password field.
12. With all of the checkboxes selected, enter the Service, Host, and Port values.

13. Now, look at the table. Review the Schema Owner column and confirm that the values are the same as what you configured in the Configure Schema section when you ran the RCU. Go back and review the screenshots in that section of this document for the schema owners if you do not remember them.
14. Complete the following if the schema owners need to be updated:
a. Deselect all the component checkboxes.
b. Select BAM Schema only.
c. Enter the Schema Owner for BAM.
d. Next, deselect BAM Schema and select the next one.
e. Enter the schema owners one-by-one.
f. Continue until all schema owners are entered.
b. Select BAM Schema only.
c. Enter the Schema Owner for BAM.
d. Next, deselect BAM Schema and select the next one.
e. Enter the schema owners one-by-one.
f. Continue until all schema owners are entered.
15. Click on Next.
16. The data source connections are all tested.

17. If all are successful, click on Next, otherwise click on Previous and correct any errors.
18. You will now see options for optional configurations. Select Administration Server, Managed Servers Cluster and Machines and Deployments and Services.

19. Next screen is for configuring managed servers. Select bam_server1 and click Delete, select soa_server1 and click Delete. Then Click Next.

And then again Next.
20. On the Configure Machine screen Click next.

21. On the next screen Move AdminServer to the right and click Next.

22. For Target Services to Cluster or Servers,If not already done, select AdminServer on the left and click Select All on the right. Click Next.
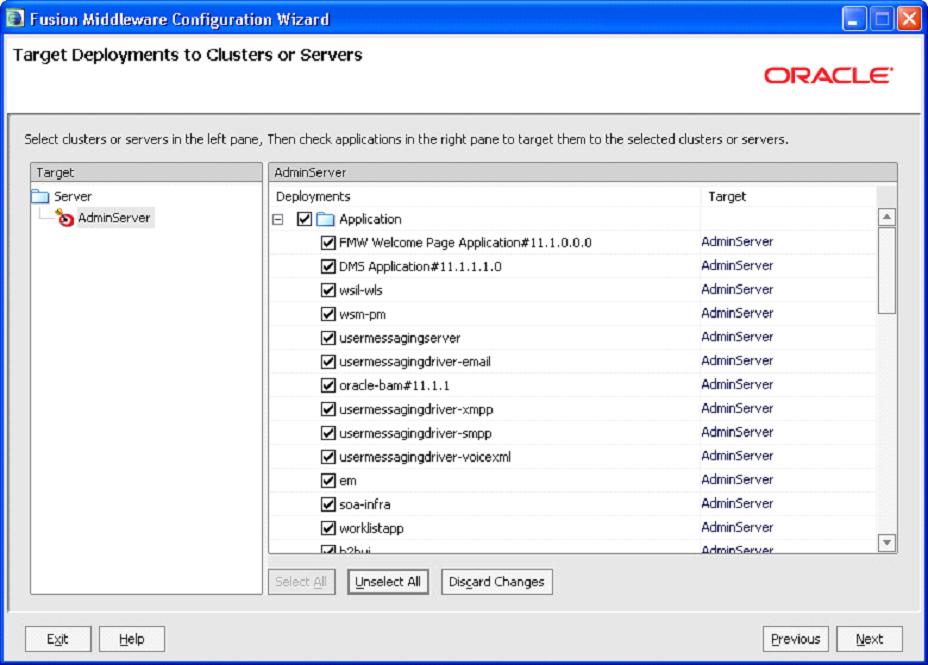
23. You reach the Configuration Summary screen.
Click on Create.

24. Wait for the creation to finish it takes few minutes. Click on Done.
This ends the process of Oracle Fussion Middleware (SOA 11g) installation.
Now you can access Oracle Enterprise Manager on http://<YourHost>:7001/em
Weblogic Server Console on http://<YourHost>:7001/console
After installing XE use below SQL command lines
ReplyDeletesqlplus sys/welcome1@XE as sysdba
SQL> show parameter session
SQL> show parameter processes
SQL> alter system reset sessions scope=spfile sid='*';
SQL> alter system set processes=300 scope=spfile;
SQL> shutdown immediate
SQL> startup
SQL> show parameter session
SQL> show parameter processes
Good information to install SOA thanks
ReplyDeleteExcellent information about how to install Oracle SOA.Thanks for sharing.Oracle SOA Certification is one in all the certifications that skilled will acquire from this company. Turning into an Oracle SOA Suite Essentials skilled can demonstrate that you just have the talents and skills so as to meet your job role. ORACLE SOA Certification
ReplyDeleteHi ,
ReplyDeleteWe have migrated our oracle webcenter server to different windows domain controller, it has
still the old domain users. When I logged with new domain user and trying to start the AdminServer its not
starting. If I logged with old domain user its starting the AdminServer, node manager and UCM.
Can you kindly suggest where I can look into?
Thanks and Regards,
Lpathi
Hi, great blog, very informative. Can anyone please help me on how to install and configure my ECLIPSE IDE to work with the Oracle Service Bus
ReplyDeleteHi Gaurav,
DeleteYou can follow step by step from
https://blogs.oracle.com/middleware/entry/installing_eclipse_for_osb_development
Now Oracle SOA training taking people has this requirement to do their practical work.This post has great contribution in to perform this installation task.Thank you.
ReplyDeleteThanks for such a great website which is helping people who is new to oracle SOA.Your site is very impressive and you are doing an amazing job.For more details about oracle fusion financial please check our website.
ReplyDeleteOracle Fusion Financial Training Institute
Hi,
ReplyDeleteThanks for sharing the successful Oracle SOA installation blog, it now gives me a strong reason to opt Mule soft as a career path which is provided with brilliant future.
Very impressive blog ,it is quite helpful.
Please keep providing such valuable information.By the way-do you have any YouTube videos , would like to watch it.
I would like to connect you on LinkedIn, great to have experts in my connection(In case, if you don’t have any issues)
Regards,
Shaili
We have migrated our oracle webcenter server to different windows domain controller, it has
ReplyDeletestill the old domain users. When I logged with new domain user and trying to start the AdminServer its not
starting. Please keep providing such valuable information.By the way-do you have any YouTube videos , would like to watch it.
I would like to connect you on LinkedIn, great to have experts in my connection(In case, if you don’t have any issues)
Oracle Weblogic Server Training
Thanks for sharing Good Information
ReplyDeleteOracle SOA Online Course Bangalore
Thanks for sharing this great information I am impressed by the information that you have on this blog. Same as your blog i found another one Oracle Fusion Financials . Actually, I was looking for the same information on internet for
ReplyDeleteOracle Fusion Manufacturing and came across your blog. I am impressed by the information that you have on this blog. It shows how well you understand this subject, you can learn more about Oracle Fusion Supply Chain Management Cloud .
Simply wish to say your article is as astonishing. The clarity in your post is simply great, and I could assume you are an expert on this subject. Same as your blog i found another one Oracle WebLogic .Actually I was looking for the same information on internet for Oracle WebLogic and came across your blog. I am impressed by the information that you have on this blog. Thanks a million and please keep up the gratifying work.
ReplyDelete